+ Reply to Thread
Results 1 to 10 of 15

Thread: She Crashed In !!!!!!

Hybrid View

  1. #1
    matt4x4 is offline Lifetime Member Verb Herder matt4x4 2 stars matt4x4 2 stars
    Join Date
    Dec 1969
    Location
    .
    Posts
    819

    Default Re: She Crashed In !!!!!!

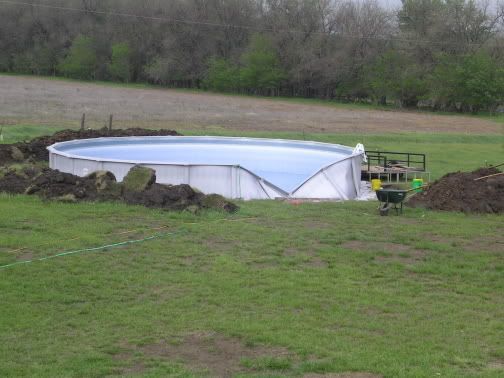
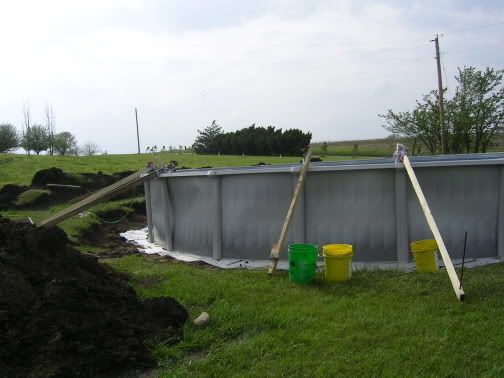
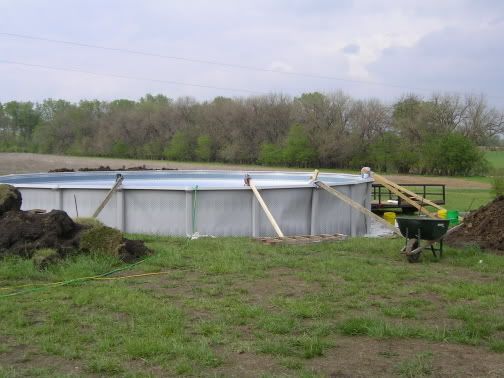
    Ouch! You have no idea how bad I feel for your situation right now, my best advice at this point in the game is to empty it and wait for a full sun day, you can hold the framework in place by tying it back from under the top rails (used wire bent into hooks to overhang wall) to stakes in the ground - like a tent.
    I thought I had a pic of mine in that state on my PC, but after looking - I don't.
    Mine stayed that way for 2 weeks waiting for the right warmer sunny day to install the liner - finally, I'd had enough and installed it on one of those grey spring days where it was threatening to rain, and I end up fnding out that my J hook liner is actually oversized - when we had it hung all around, I had almost a foot of material left over - now since we had tugged it as we hooked it on, we ended up untugging it all around and it ended up seating perfectly.
    Yours needs full sun, if you put it in with full sun - likely a morning job, then let it hang until noon or 2 pm before adding water, it should stretch plenty for it all to come together.
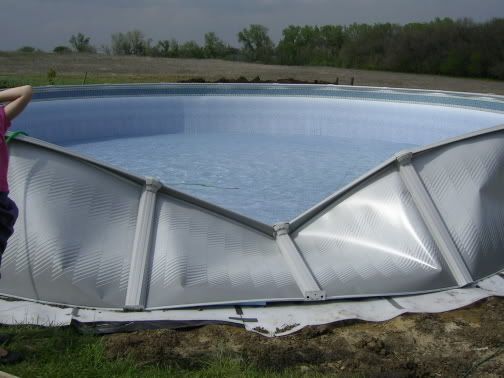
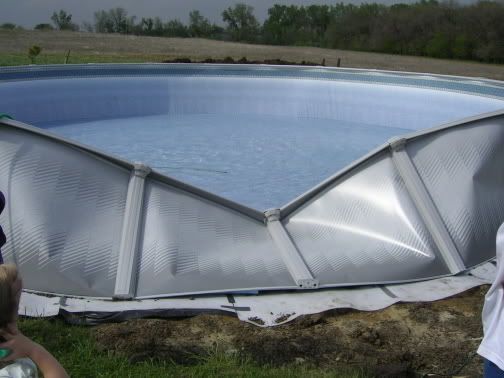
    Your wall looks ok, no real big creases. from what I can tell, it'll all work out just fine.

  2. #2
    NWMNMom is offline Registered+ Widget Weaver NWMNMom 0
    Join Date
    Nov 2004
    Location
    WAAAY NW Minnesota
    Posts
    461

    Default Re: She Crashed In !!!!!!

    Yikes. I feel so bad for you! That is what was happening with ours and we stopped and the next day at about 11:30 began again when it was HOT and sunny - man, that liner stretched like ever. All is not lost, it will go and it will be good. Just waiting on the sun - I see in the forecast that it IS on its way - this afternoon or tomorrow it should be perfect for that liner. Fingers crossed for you.
    Beats driving to the lake!
    18'x33'x52" AG oval, hard plumbed system, 22" Pentair Meteor Filter 1.5hp pump, Goldline SWCG System, 2/4x20 SolarBear Panels, Biltmore Steps - 16x14' composite deck, Pool Rover Jr

  3. #3
    Join Date
    May 2006
    Location
    Kansas
    Posts
    139

    Default Re: She Crashed In !!!!!!

    Thank you guys for your help.
    One more question.

    Our fear is this: When there is little to no water in the pool the liner
    is 8 to 12" away from the walls and about 6" or more away from the foam
    cove. Will the liner stretch that much into place under the sun?
    Can we leave the liner hanging in the pool ( forecast is for rain for the next
    5-6 days)?

    When we had 8" of water in the pool, the liner was still quite
    away from the wall and cove.

    One other thing, the top rails could be as much as 1" out of level worst case.
    Is that acceptable?
    It looked good using a four foot level with a board on edge.
    But later we used a laser level it was out of level 1/2" to 1".

    Update:
    We pumped the water down to 2-3" and most of the sides popped back into
    shape.

    Thank you,
    ~Hoffmans

  4. #4
    Join Date
    May 2006
    Location
    Kansas
    Posts
    139

    Default Re: She Crashed In !!!!!!

    Matt-
    Thank you for the PM, it was very helpful.
    6 daughters and 2 boys.... I don't know how much help any of them are. Not one of them is taller than my shoulders.

    We will do take your advice on the liner adjustment.
    I think you are right. Too many wrinkles on the bottom and not enough sun.

    We did measure the pool- it is round.

    It sure is a nice to have you guys all here.

    So i guess we wait for a hot sunny day.
    Should we leave the liner hang there till next week or should we drop the line down to the floor?

    Thank You.
    ~Hoffmans
    Last edited by hoffmans; 05-07-2007 at 01:57 PM. Reason: forgot

  5. #5
    Join Date
    May 2006
    Location
    Kansas
    Posts
    139

    Default Re: She Crashed In !!!!!!

    Forgive me for all the questions guys,


    While we are reinstalling the liner ( on the hot sunny day ) should we leave the top rails off untill the liner is completely on or will that make the wall want to buckle in ?

    Thanks a ton,
    ~Hoffmans

  6. #6
    matt4x4 is offline Lifetime Member Verb Herder matt4x4 2 stars matt4x4 2 stars
    Join Date
    Dec 1969
    Location
    .
    Posts
    819

    Default Re: She Crashed In !!!!!!

    Ok, I'll attempt to answer all questions with this post:

    I replied to your other thread extensively - would recommend reading that too - you probably did allready.

    Your pool is 33', you can be out over an inch and no problems, so the 1/2" to 1" is completely acceptable.

    I can say with confidence that once you empty the liner off and pull it into the right position more appropriately, you will get a lot closer to your walls, the north side looks like it fit very relaxed against the cove and wall judging from the picture, once you adjust it's position as I explained in my text and other post, I'd say you'll have maybe 4" of play there and if you follow my advice and pull the floor outwards as I described when it's got a little water on it, you'll reduce that number to 2". at this point, you'll be swearing at me under your breath since it makes you fingers sore doing that, but you WILL gain a lot of material this way. The time it takes to do that will also help heat and soften the liner.
    Think of it this way - 1 small wrinkle easily converts to 1/4" of extra liner on the floor once flat, a larger wrinkle is more like 1/2 inch gained - compare how many wrinkles you see to how many inches you need and you'll have more than enough liner to fill that floor side to side. In the pic with your daughter, I can see SO MUCH available liner, most of those wrinkles are 1-1.5" tall, flattened, they'd gain you 1.5 inches each.
    Since it's 5 days of rain, I'd pump it off, fold it in and cover it from any sun (not likely) with a piece of cardboard or something.... I'd worry about wind getting under it if you leave it hanging in there...

    When you lay in right the next time, do this: - And make sure you DO NOT have a seam at or near your skimmer/return. I'd hate to see you take it all down again....

    Take the sides and fold them onto the floor, grab the side/floor seam and with a person on the opposite end, pull tight, measure, place a piece of electrical tape at the center, do this in the opposite direction, it should give you your center point with an X on the liner.

    Now get two people on the outside to hold a tape measure across center of pool, drop a string line at center and put the X under it, remeasure do in opposite direction, tug X into proper place. Recheck this all.
    Place a piece of cardboard (protection) down on the X onto which you place a full bucket of water, that should hold it all there, now straighten your liner as best as you can towards the edges.
    If it were an overlap, I'd do as Dennis did with the latest install, unforunately you won't have all that excess material at hand.
    You can hang the edges in several locations and add a little water - (1") so you can tug the wrinkles out of it towards the ends as I described earlier to you. Once that's done hang the liner fully (without skews as I also described earlier)., then slowly fill, if you notice that the liner needs a little more persuasion here or there, get back inside, and tug from close to center towards that particular corner, it won't do it itself, you have to do it.
    once you've got it remove bucket and cardboard underlay, fill, once up about 8-12 inches, you can cut in your return and skimmer if you are happy with the way the walls are now hanging (no skew), if not, readjust as necessary, then cut in return and skimmer, smaller than actual hole by about 1/8". Install fixtures.

    I highly recommend hard plumbing shutoff valves at each fixture - about $15 each, you need them many, many, many, many times and you'll be glad that you did it right away.


    Shopvacs are handy to help pull it into place and see how it will sit - they help you adjust it close to where you need it to be before adding water.
    Duct tape a piace of cardboard over skimmer and return, cut an opening in teh cardboard over return the size of shopvac hose and shove through/seal with tape.
    Last edited by matt4x4; 05-07-2007 at 03:34 PM.

  7. #7
    Join Date
    May 2006
    Location
    Kansas
    Posts
    139

    Smile Re: She Crashed In !!!!!!

    Yippee!!!!!!
    Before I give our update I want to stop and give thanks to you all who have helped us and sympathized for us.
    And a special thanks to Matt & Dennis.
    This was a serious P.I.A but definitely worth it.

    Ok...
    SO the hot sunny day came today. All sun and in the mid to upper 80's. And NO WIND!!

    Yesterday Tom took down the liner and fixed the few bent up rails ect. ect.
    Today Tom got up before the sun and started the coffee pot and went out to turn on the pump(not the pool pump) to get all the water out.
    Then he measured for round and checked for level. Made adjustments and got everything to less than an 1" away from perfection.
    Then He, Grandpa & I hung the liner.
    We got the liner in much better this time. The bottom is smooth and is pushed all the way to the walls.
    All went splendidly!
    We turned on the hose, put on the topseats and caps.
    She has been filling for about 7 hours now.
    We have no signs of worry and the liner fits great.

    I can't thank you all enough,
    I hope lots of people read and learn from our mistakes.

    Next step is to get 'er filled w/ water then backfilled and get the porch built ASAP.
    I will keep the photo chronicle going.

    ~Happy Hoffmans

+ Reply to Thread

Tags for this Thread

Bookmarks

Posting Permissions

  • You may not post new threads
  • You may not post replies
  • You may not post attachments
  • You may not edit your posts